• Skip to primary navigation
  • Skip to main content
  • Skip to primary sidebar

Brooklyn Berry Designs

DIY and Design for Creative Moms

  • Family Fun
    • Games & Fun
    • Kids Crafts
    • Lifestyle
    • Book Shelf
  • Crafts
    • Laser Crafts
    • Cricut
      • Cricut Projects
      • Cricut Tutorials
    • Sublimation
  • Holidays
    • New Years
    • Valentines Day
    • St. Patricks Day
    • Easter
    • Mothers Day
    • Fathers Day
    • Summer
    • Patriotic
    • Canada Day
    • Back To School
    • Halloween
    • Thanksgiving / Fall
    • Christmas
  • Digital Downloads
    • SVG Files
    • Printables
  • Shop
  • Brooklyn Berry Designs
  • About
  • Press/PR
  • Blog
  • Shop

Crafts

Home » DIY Faux Leather Earrings

DIY Faux Leather Earrings

Created On: April 7, 2017  |  Updated: July 18, 2019  |   9 Comments

Pin
Share
Post
398Shares

This post may contain Amazon and other affiliate links. Using these links, I earn a small commission at no additional cost to you.

Have you always wanted to make your own jewelry? Using the Cricut Explore Air you can use basic shapes or any creative design that you can dream of.  Here is a simple project tutorial that you can follow to create your own pair of faux leather earrings. Make a pair for your friends for a gift!

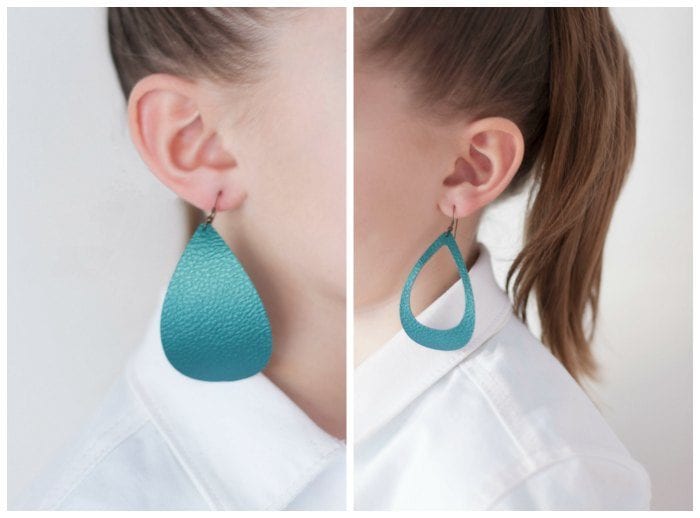
PIN THESE DIY LEATHER EARRINGS TO YOUR PINTEREST CRAFT BOARD!

How To Make Your Own Faux Leather Earrings

This post contains affiliate links. If you purchase something after clicking on this link a tiny percentage will go to support this site.  This is at no cost to you and helps to keep this site running with free content. You can get details on the policies page here. blog graphic

  • Cricut Explore Air™
  • Cutting Mat
  • Faux Leather Color Peacock
  • Fishhook Earwire Earrings
  • Needle Nose Pliers

Instructions:

Start by opening Cricut Design Space™ and finding a shape you would like.  I used the basic teardrop shape in Cricut Access and adjusted the width and length.   You can use my designs by opening each link below (it will open into design space and you can then save it to your own account). The best part? It only uses basic shapes that are FREE!

Free Cricut Cut Files:

Solid Tear Drop Earrings

Cut Out Tear Drop Earrings

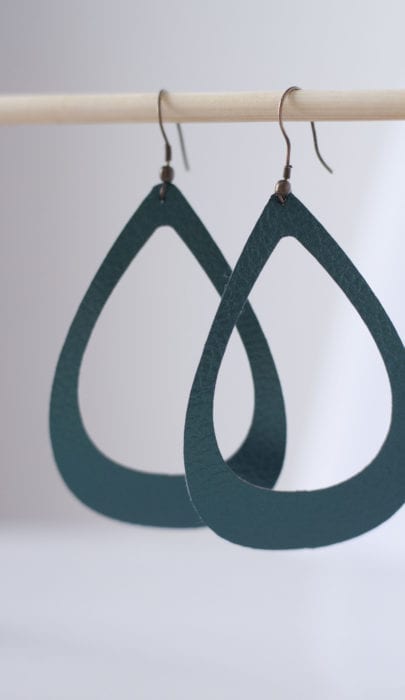
Once the size is exactly as you want click “Go”.  Make 2 copies of your project to make two earrings at once.  If your shape is not symetrical (or not the same on both sides) you will want to group the two images together and cut only one copy of the project.

Place your faux leather face down on the cutting mat.  Set the dial to custom and chooose Leather, Faux, 1mm (Cricut) when it asks you.  Load your mat and push “Go”. 

*If you are using the cut out tear drop shape file it will not show the small teardrop cut out shape as it is hidden behind the large tear drop shape.  This layout allows the small shape to be cut first, which makes it easier to keep everything in place.  I used a regular grip cutting mat, but if you want to cut an intricate design I would suggest using a strong grip (the purple) mat.*

Remove the shapes from the cutting mat.  
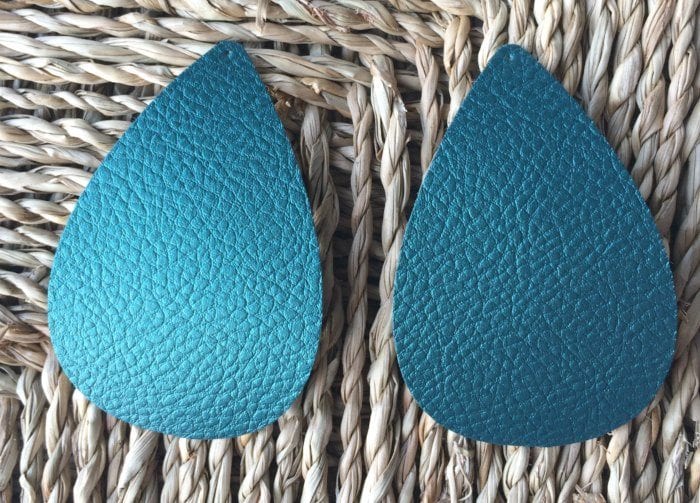
Assembling:

Use a poking tool to punch a small hole in the top of the tear drop shape.  Use the needle nose pliers to open the loop and attach to the leather earrings and close the metal loop. Thats it!  Faux Leather Earrings are made.

I love the faux leather from Cricut because the material itself is very thin which is perfect for earrings because it allows you to wear large shapes without pulling on your ear lobes or hurting your ears after wearing them for a short time.  

Pin
Share
Post
398Shares

posted in: Crafts, Cricut Projects

Previous
My House: The Laundry / Garage Door Before
Next
What Materials Can The Cricut Explore Cut?

Reader Interactions

    Leave A Reply! Cancel reply

    Share your thoughts!
    Your email address will not be published. Required fields are marked with *

    RATE THIS!


    This site uses Akismet to reduce spam. Learn how your comment data is processed.

    Comments & Reviews

  1. Catina says

    September 5, 2017

    I can’t find the tear drop shape on my cricut app.

    Reply
    • Brooke says

      September 6, 2017

      If you search the catalog of images, the tear drop I used was: Tear Drop #MFB0BF from the Bits and Pieces cartridge. You should be able to open the links I shared below to get the exact same shapes I used – I did adjust the width and height of the drop.

      Reply
    • Brooke says

      November 26, 2017

      My file is here: https://design.cricut.com/#/design/57588689 but if you search design space its called “Droplet” and is available with Cricut Access.

      Reply
  2. Casey says

    October 11, 2017

    Where can I find more colors of this material? I’m looking for a red color

    Reply
    • Brooke says

      November 26, 2017

      There are more options available in the Cricut store online. They just came out with a real leather in Red that is so beautiful (seeit here https://goo.gl/VqXKHq) and there is now a red in the faux leather (here: https://goo.gl/2E1ffi)

      Reply
  3. Megan Davis says

    November 26, 2017

    When I cut the cutout using the link, the larger teardrop cuts on top of the first cut and off the page cutting the mat. What am I doing wrong?

    Reply
    • Brooke says

      November 26, 2017

      I just looked at it again, It should be cutting fine. When it pulls up the cut files and shows them on the cutting mat, you can drag the shape around. Maybe check there?

      Reply
      • Megan Davis says

        December 2, 2017

        Thank you! It is showing it where I can drag the shape, but some are crooked after cutting, my eyes are getting old! Do you know a secret of how to get it aligned in the center once you are on the preview mat?

        Reply

Primary Sidebar

Brooke - Author of Brooklyn Berry Designs.

Brooke is an interior designer and DIY’er who loves all things creative and crafting. She loves to be busy with at least 3 projects on the go and is constantly chatting or singing along to the radio. As a mom to 4 boys, she is always blending creativity and chaos, with some diet coke mixed in. Stick around for the big projects and get 20 little projects in between.

More About Me

Step By Step Guide To Your Cricut!

Level Up Your Cricut Game - Become a pro in 5 days with this free Cricut email course.

Thank you for subscribing!

Let's Get Creative

Subscribe to get free SVG files, Cricut and laser cutter tutorials, fun printables, and easy crafts right to your inbox! Its free!

Thank you for subscribing!

Featured Projects

  • Customize With Cricut Design Space Tools
  • Best Cricut Access Fonts
  • make your own canada 150 waterbottle
    How to upload your own images with Cricut
  • How To Upload A SVG File To Cricut Design Space

Let's Get Creative

Subscribe to get free SVG files, Cricut and laser cutter tutorials, fun printables, and easy crafts right to your inbox! Its free!

Brooklyn Berry Designs Logo

About

  • Brooklyn Berry Designs
  • About
  • Press/PR
  • Blog
  • Shop

Topics

  • Crafts
  • Cricut Projects
  • SVG Files
  • Printables
  • Cricut Tutorials

Holidays

  • New Years
  • Valentines Day
  • St. Patricks Day
  • Easter
  • Mothers Day
  • Fathers Day
  • Canada Day
  • Back To School
  • Thanksgiving / Fall
  • Halloween
  • Christmas
©2025, Brooklyn Berry Designs. About Press/PR Back To Top
Design by Pixel Me Designs
×

Let's Get Creative

Subscribe to get free SVG files, Cricut and laser cutter tutorials, fun printables, and easy crafts right to your inbox! Its free!

Thank you for subscribing!