• Skip to primary navigation
  • Skip to main content
  • Skip to primary sidebar

Brooklyn Berry Designs

DIY and Design for Creative Moms

  • Family Fun
    • Games & Fun
    • Kids Crafts
    • Lifestyle
    • Book Shelf
  • Crafts
    • Laser Crafts
    • Cricut
      • Cricut Projects
      • Cricut Tutorials
    • Sublimation
  • Holidays
    • New Years
    • Valentines Day
    • St. Patricks Day
    • Easter
    • Mothers Day
    • Fathers Day
    • Summer
    • Patriotic
    • Canada Day
    • Back To School
    • Halloween
    • Thanksgiving / Fall
    • Christmas
  • Digital Downloads
    • SVG Files
    • Printables
  • Shop
  • Brooklyn Berry Designs
  • About
  • Press/PR
  • Blog
  • Shop

Design & Home Decor

Home » Design & Home Decor » Red Kitchen Redesign

Red Kitchen Redesign

Created On: February 4, 2013  |  Updated: January 1, 2015  |   13 Comments

Pin
Share
Post

This post may contain Amazon and other affiliate links. Using these links, I earn a small commission at no additional cost to you.

Tim & Sue are about to move into a new home. Before even moving in, they want to paint the walls in the great room and kitchen. Their goals were to lighten the space and to have a paint color that would look good with the color going up the stairs, but different enough that it doesn’t look like you tried to match the color and failed.
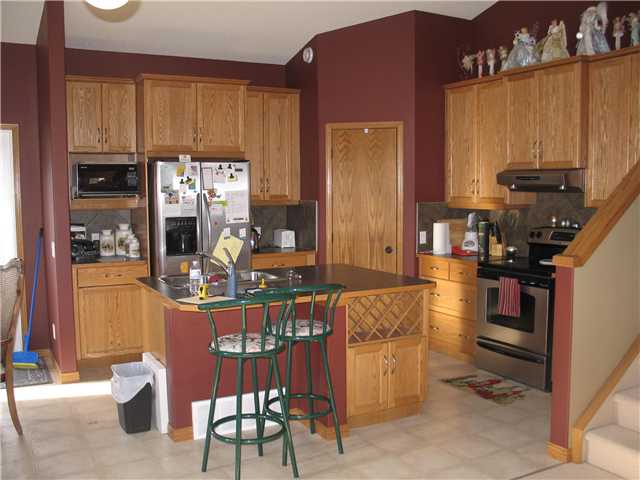
This is the before I was shown. Scary, dark, and very cluttered.  I will now show you what I have dreamed up for this space.
Option 1: Paint the walls a neutral color.
Already this is a million times better, but I would still like to see it updated a bit more.
Option 2: Paint the walls and paint the cabinets
Option 3: The Whole Wham Bham.
Obviously, this is just an IDEA of what you could do. However, I think this kitchen would look AMAZING with a light paint color such as Moonshine or Palladian Blue from Benjamin Moore. The cabinets are in great shape, and the layout works well, so I would suggest painting the cabinets white.
Options that could be added over time:
  • A new pantry door with a glass insert to break up the massive wall of wood.
  • Hardwood floors – any stain would look amazing in this kitchen.
  • Backsplash – a white subway tile or mosaic would look good, if you like the look.
  • Granite Countertops: I have shown Alaskan White.
 Lets look at the before and afters of that again:
UMM. I think I just drooled all over my desk. I love it. I hope they like what I have come up with!
signature
Pin
Share
Post

posted in: Design & Home Decor

Previous
Bonus Room & Tech Center
Next
Creative Ways To Use The Space Under The Stairs

Reader Interactions

    Leave A Reply! Cancel reply

    Share your thoughts!
    Your email address will not be published. Required fields are marked with *

    RATE THIS!


    This site uses Akismet to reduce spam. Learn how your comment data is processed.

    Comments & Reviews

  1. Jill Herbst says

    February 4, 2013

    Great job looks 100% better!!

    Reply
  2. Jenny Hill says

    February 4, 2013

    Wow! Looks so much better. I think I need to have you over to our house – we need to do some painting and I do not have the eye you do.

    Reply
  3. Heather says

    February 4, 2013

    oh they MUST change out that pantry door! What a big impact that has for not too much money. Nice job Brooke!

    Reply
    • Brooklyn Berry says

      February 4, 2013

      Thanks Heather! I love that pantry door. And secretly wish it was mine!

      Reply
  4. Shauna@Satori Design for Living says

    February 4, 2013

    Great suggestions! It looks so fresh and updated! What program do you use to simulate the changes? I’m looking for something like it.

    Reply
  5. Misty says

    February 5, 2013

    Great makeover!

    Reply
  6. SamiJoe says

    February 5, 2013

    This is a great makeover! That kitchen won’t know what hit it— except some paint! 🙂

    Reply
  7. Brodies Mom says

    February 6, 2013

    Love it! I now wish I had a white kitchen.

    Reply
  8. karinb says

    February 15, 2013

    I would recommend adding glass (or frosted glass) front doors to the two cabinets on each side of the stove…SO much wood.

    Reply
  9. diane says

    November 21, 2014

    I would like to know what software or app did you use for this transformation above??

    Reply
    • Brooke says

      November 21, 2014

      I used adobe photoshop! Its just a quick idea, not a high quality photo (obviously) but you can do much more with it!

      Reply

Primary Sidebar

Brooke - Author of Brooklyn Berry Designs.

Brooke is an interior designer and DIY’er who loves all things creative and crafting. She loves to be busy with at least 3 projects on the go and is constantly chatting or singing along to the radio. As a mom to 4 boys, she is always blending creativity and chaos, with some diet coke mixed in. Stick around for the big projects and get 20 little projects in between.

More About Me

Step By Step Guide To Your Cricut!

Level Up Your Cricut Game - Become a pro in 5 days with this free Cricut email course.

Thank you for subscribing!

Let's Get Creative

Subscribe to get free SVG files, Cricut and laser cutter tutorials, fun printables, and easy crafts right to your inbox! Its free!

Thank you for subscribing!

Featured Projects

  • Customize With Cricut Design Space Tools
  • Best Cricut Access Fonts
  • make your own canada 150 waterbottle
    How to upload your own images with Cricut
  • How To Upload A SVG File To Cricut Design Space

Let's Get Creative

Subscribe to get free SVG files, Cricut and laser cutter tutorials, fun printables, and easy crafts right to your inbox! Its free!

Brooklyn Berry Designs Logo

About

  • Brooklyn Berry Designs
  • About
  • Press/PR
  • Blog
  • Shop

Topics

  • Crafts
  • Cricut Projects
  • SVG Files
  • Printables
  • Cricut Tutorials

Holidays

  • New Years
  • Valentines Day
  • St. Patricks Day
  • Easter
  • Mothers Day
  • Fathers Day
  • Canada Day
  • Back To School
  • Thanksgiving / Fall
  • Halloween
  • Christmas
©2025, Brooklyn Berry Designs. About Press/PR Back To Top
Design by Pixel Me Designs
×

Let's Get Creative

Subscribe to get free SVG files, Cricut and laser cutter tutorials, fun printables, and easy crafts right to your inbox! Its free!

Thank you for subscribing!