Is anyone else surrounded by the friendship bracelet making craze? If you are looking to learn a new friendship bracelet pattern you have to check out the 8 Strand Kumihimo Bracelet.
Learning to create and work with your hands is so important. Kids can learn so many skills beyond the technical skill they are learning in the moment! When a studen finishes work early, it is important for them to be able to work on another task without disrupting the class. If a child is upset and needs some space, an activity that keeps their hands busy is a great option.
Easy friendship bracelet patterns
Crafts for young kids need to be easy to follow but interesting enough to keep them entertained. The best bracelet pattern for younger kids to make is the 7 strand jellyfish bracelet (or the 7 strand kumihimo bracelet). See the tutorial and learn my secret DIY loom.
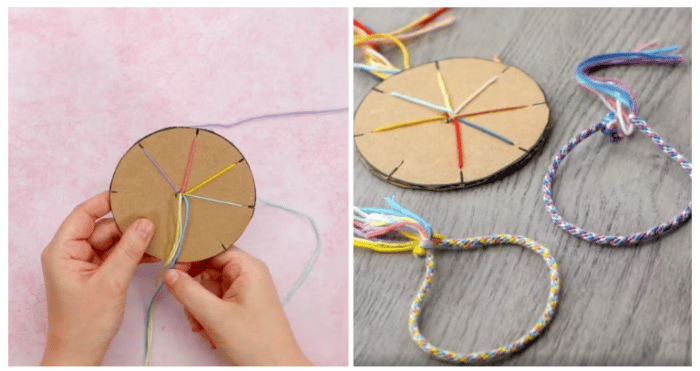
Want another easy bracelet pattern?
After you are feeling confident in setting up a bracelet in the kumihimo disc and want to try a new pattern, the next easiest bracelet is the 8 strand kumihimo bracelet.
To get started you will need a kumihimo disc and 8 pieces of yarn.
Getting Started With The Kumihimo Disc
For learning purposes I will show you have to start with a two color set up. You want four pieces of yarn in each color.
Tie the ends into a knot and place the knot into the center hole of the disc.
Disc Strings Setup
Begin by placing the pink strings in slots 1, 2, 17 and 18. Place the teal strings in 9, 10, 25, and 26.
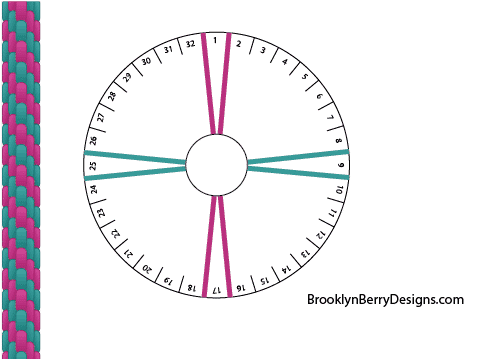
Each set of two strings form a group. For this kumihimo bracelet we have four groups and two strings in each group. Other patterns may have more or less number of groups and any number of strings in each group.
Tying the bracelet
There are three basic steps to remember in this bracelet.
First you take the top right string in slot 2 and move it to slot 16.
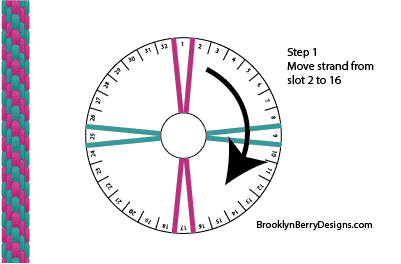
Second move the string from slot 18 to 32

Third turn the disc counter clockwise so the next color is pointing up. Repeat this process with the next groups of strings.
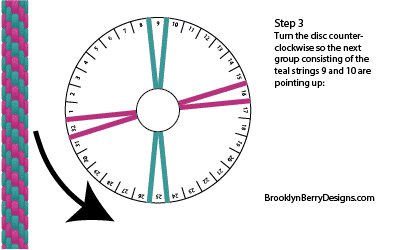
To summarize: Right string down, left string up, turn the disc.
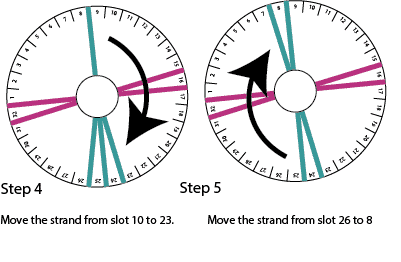
Moving along
As you move along and get into a working rhythm you may not pay attention to the numbers. Some people really rely on the numbers to keep them from getting lost. I find that I work a bit faster when I ignore the numbers and just work with the pattern.
Tying Kumihimo bracelets
Finally, once the bracelet has reached the length you like, take the strands from the loom and tie a knot. I like to tie them together into another knot but you could also attach a clasp to be able to remove it whenever you like.
Happy Crafting!

Here are a few more craft ideas to check out:
Retreat crafts to do with friends
Friendship Bracelet Patterns once you master this basic bracelet!
Hot Rocks – start it with the kids and you’ll want to make your own!

Leave A Reply!