Just starting out
Did you just set up your Cricut machine and not sure what to do next? This is where you will learn the basics of Design Space for beginners for use with all Cricut machines.
Design space is the program where you can choose, design, and customize designs and send them to your Cricut to cut. This tutorial is for all Cricut machines – the Cricut Explore, Cricut Explore One, Cricut Explore Air, Cricut Explore Air 2, Cricut Maker and Cricut Joy machines.
Overview – Cricut Design Space For Beginners
Before starting out, go to Design.Cricut.com and download the software to your computer. Or download the app to your device. Create a design space account and you are good to go!
There are two parts of design space, the home page and the canvas. The home page is where you find new and saved projects. Canvas is where you will arrange or design your projects.
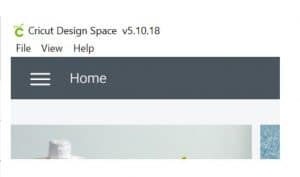
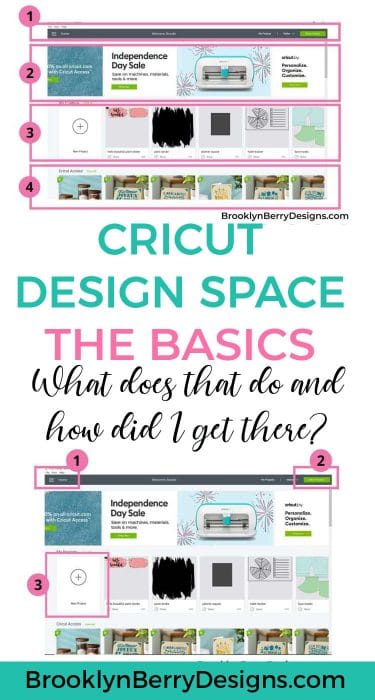
THE HOME PAGE
When you open design space the first page you see is the home page. There are 4 parts of the home page – the header, banner, my projects, and featured content.
The 4 Parts Of The Home Page

- Header
- Banner
- My Projects
- Ready To Make Projects
Header
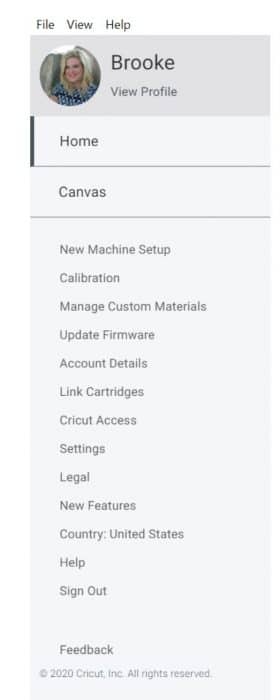
The menu icon – also called the hamburger. This allows you to switch between the home page and the canvas.
This menu also contains new machine setup, calibration, account details, link cartridges, cricut access, settings and help. The settings tab is where you can turn off the grid on the canvas or adjust the units shown.
Banner
This carousel area scrolls through a few featured slides. This is where new information, special offers, maintenance announcements, or new products will be featured here.
My Projects
Here is where your projects are displayed, sorted by most recently opened. Click on VIEW ALL to view them all. This is where you can scroll through to search for a specific project.
Ready To Make Projects
These next few banners show ready to make projects sorted by categories. Examples include projects included with Cricut Access, projects by material, or by machine will be featured here.
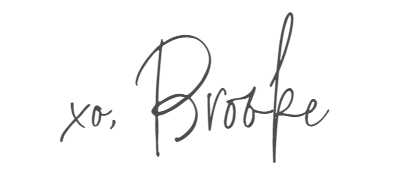
THE CANVAS
You can get to the canvas from 3 different areas on the homepage you can click on, shown here:

There are 3 areas with toolbars in the Canvas area. The (1) header, (2) the design panel, and (3) the layers toolbar. You will see them labelled here:

The Header
The header contains the menu, project name, machine selection menu and the green Make It button.
Be sure to select which machine you will be using so that the correct menu’s and tool options will be available for you.

Design Panel
New
This will open a new blank canvas page.
Templates
Templates give you a reference for size and scale. This image will not cut, it just shows you on the canvas how large your shirt or item to be customized is so that you can size your design accordingly.

Projects
Search for project ideas and ready made designs. Projects can be sorted into various categories including project type, seasons, or events. Examples include featured projects, cricut access, cards, christmas, infusible ink, iron on, knife blade, sewing, and planners.


Images
Browse, select, and insert images from the Cricut Image Library, including your own uploaded images, to the Canvas.

Text
Add words and phrases to the Canvas. When text is added the Text Edit toolbar will appear. Check out the Best Cricut Design Fonts.

Shapes
Add basic shapes, such as circles, squares, triangles, and lines to your Canvas. There are a lot of things you can do to design and customize your projects using basic shapes. We will go into detail about that in another tutorial.

Upload
Cut your own images by uploading .jpg, .gif, .png, .bmp, .svg, or .dxf image files to use for free. Here is a tutorial for details on how to upload your own image and how to upload an svg.

Layers Panel
The layers panel will show each item on its own layer of your designs. The color choice of each layer is important because it will group every layer of the same color onto the same cutting mat.
Every design that shows up as teal with cut out on the same piece of paper. The layers allow you to adjust the pieces individually and change their line type (if it will cut, draw, emboss, etc).
If you had a card that would have a shape cut out as well as a score line, you would want the card, score line, and cut all on the same layer and attached together.
Cricut Design Tools
Looking to customize your projects in design space? When you are feeling ready you can learn about Shape, Flatten, Weld, Group, Contour here.
If you would like to save this for later, please pin it!
Happy Crafting!

Comments & Reviews
Angela says
Thank you!
Cora Ihnen says
Thank you for your help. I’ve had my Cricut over a year and still have no idea how to use it. So far it’s just a huge waste of money!!!
Cora
Riya Sen says
This is a great post for beginners!
Mrs Gloria Fisher says
Very informative and helpful, being very new to this any help that I can understand is useful. Thank you