This is one in a series of posts answering some of the most frequently asked questions about the Cricut machine. See all the other posts in the series HERE. If you still have questions feel free to reach out via email or social media and I will get back to you.
Upgrading A Cricut Machine With Cartridges
I recently had a cricut craft night with a friend of mine who had owned an older version of a Cricut machine that still used Cartridges. Since I didn’t own a machine until the Cricut Explore, it was interesting to talk craft with her and it was interesting to see what great features have been added to the new machines.
The new features that made such a huge difference were being able to mirror image your designs for iron on. The older machines didn’t have this ability, so you had to cut out each letter or shape, then free hand place them on your material. Luckily now the letter spacing can stay the same because you cut the back side of the iron-on vinyl and the clear layer acts like a built in transfer tape, keeping everything properly spaced out.
If you are upgrading to a Cricut Explore you can link your cartridges to your account so all the images you purchased can be used in Design Space too! It’s pretty simple to do.
How do I link cartridges to Cricut Design Space with my Explore machine?
Make sure your machine is turned on and connected to the computer with the USB cable. Open up design space, making sure you aer logged in to your account.
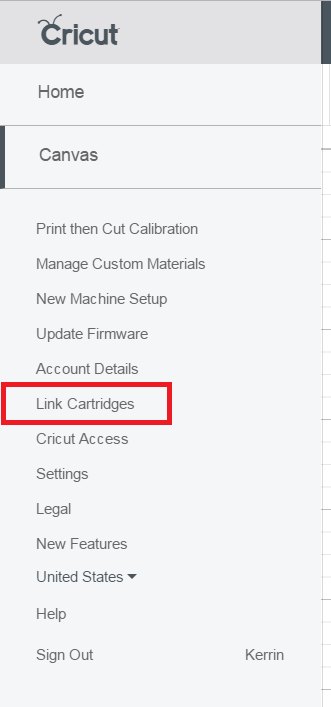
- Click on the Account Menu in the upper left corner of Cricut Design Space and choose “Link Cartridges” from the menu.
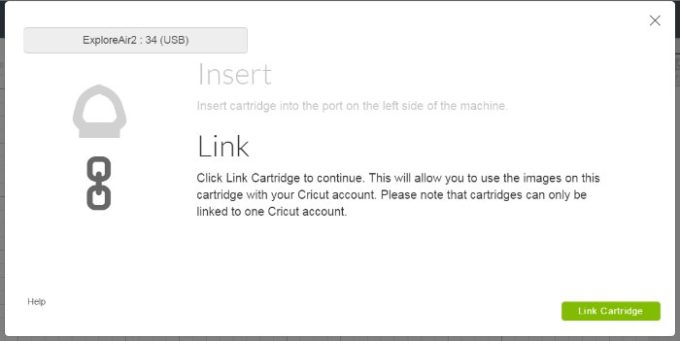
- Select your Cricut machine from the drop-down menu. For best results, wait until Design Space has connected to your machine before inserting your cartridge. Once the machine has been detected, insert your cartridge into the cartridge port above the “Open” button on the machine, and click the “Link Cartridge” button.


If you have already linked your cartridges to your account through Cricut Craft Room, they will automatically be available in Cricut Design Space. There is no need to re-link them. For instructions on how to link your Cricut Gypsy to your Cricut.com account, please visit this help article.


Comments & Reviews
Shelly says
Hi, I have a Maker and I’m looking for a Cartridge Adapter to use with my Maker. Do you know how I can adapt them without an adapter? I have over 100 cartridges already linked … I would greatly appreciate it. I sold my old Maker to a dear friend but she would like to use a Cartridge Adapter if that what she needs to see what is on a cartridge. And then use it on her own Design Studio. Anything would help if you know any answers …. Thank you, & Happy Holidays! Shelly
Brooke says
HMMM, I know the explore air machines have a cartridge adapter. Maybe ask in a local Cricut group if someone would convert them for you.
Paul D. Race says
Unfortunately, if you have an explore with a cartridge adapter, you can only link cartridges to the explore’s original owner. So in the best case, it won’t work at all. In the worst case, you could accidentally link all your cartridges to someone else’s account.
Paul D. Race says
Adding to the above comment. I have a brand new Aire 2 with a cartridge adapter built in, but it doesn’t even recognize most of my cartridges, even ones I broke the seal on myself. If this happens to you, you can call customer service. After some discussion and pushback, they will give you an incident number. You write the incident number on a piece of paper and lay the cartridges you want to link on the paper. Take photos front and back. Reduce the size of the photos to 1200 or less and E-mail them to the address they send you. That proves the cartridges are in your possession. It also gives them the chance to run the serial numbers if they suspect you’re trying to link cartridges that someone else has already linked, but they usually don’t bother. IF you send photos directly from your phone without shrinking them, the Cricut server will block them. I learned all of this the hard way. 🙂