• Skip to primary navigation
  • Skip to main content
  • Skip to primary sidebar

Brooklyn Berry Designs

DIY and Design for Creative Moms

  • Family Fun
    • Games & Fun
    • Kids Crafts
    • Lifestyle
    • Book Shelf
  • Crafts
    • Laser Crafts
    • Cricut
      • Cricut Projects
      • Cricut Tutorials
    • Sublimation
  • Holidays
    • New Years
    • Valentines Day
    • St. Patricks Day
    • Easter
    • Mothers Day
    • Fathers Day
    • Summer
    • Patriotic
    • Canada Day
    • Back To School
    • Halloween
    • Thanksgiving / Fall
    • Christmas
  • Digital Downloads
    • SVG Files
    • Printables
  • Shop
  • Brooklyn Berry Designs
  • About
  • Press/PR
  • Blog
  • Shop

Crafts

Home » Holidays » Christmas » Mini Wood Poster Hanger Ornament

Mini Wood Poster Hanger Ornament

Created On: December 4, 2019  |  Updated: April 4, 2022  |   1 Comment

Pin
Share
Post
16Shares

This post may contain Amazon and other affiliate links. Using these links, I earn a small commission at no additional cost to you.

Add some farmhouse style to your Christmas decorations with this easy DIY Mini Wood Poster Hanger Ornament. Make it in any style to fit your home. via @brookeberry

If you love farmhouse style poster hangers, you will love the mini version as an ornament for your tree! This DIY wood poster hanger ornament would be great for anyone with a farmhouse style Christmas Tree, but could also be made to match any tree decor style! Get the instructions here!

I love using wood slats to hang poster size prints in my home, and what makes an idea even better is to make it miniature! I made a stack of these mini wood poster hanger ornaments with basic printer paper, tongue depressors (large popsicle sticks) and twine. Easy and cheap, just the way I like my crafts.

Mini Wood Poster Hanger Ornament - instructions on how to make your own.

*Note – I am telling you how I made this the same way I explained it to my friend. Because you can kind of make it up as you go, its not a set list of instructions to follow like a typical tutorial. I didn’t measure, and I made a few in one sitting and made a few adjustments to each one. You can choose your own adventure in this craft, so feel free to read along and wing it yourself!

How To Make A Mini Wood Poster Hanger Ornament

I will admit that I didn’t measure anything with this project. I began by getting an exacto knife and cut the ends off the tongue depressors. You will need 4 sticks for each ornament. I left mine plain, but I want to make another set and paint or stain them for ALL the options. Because why not?

Feel free to use sanding paper if your stick edges are sharp. I didn’t, but you totally could.

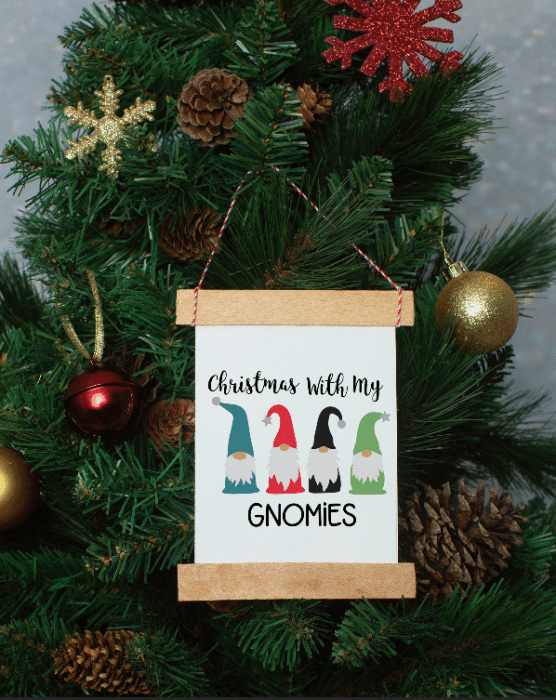
Choose whatever design you like and print it to size on your paper. I printed two images side by side on a piece of paper (the horizontal / portrait direction). I left enough white space on either side of the design that you could trim it to whatever size you wanted and still look good. You want the paper to be inset from the ends of the sticks, and leave enough room to tie a string outside the edge of the paper on each side. Does that make sense? Look at the finished picture and you will understand what I mean.

The designs I used are from my free Christmas Gnomes SVG and the other is from my etsy shop for SVGs. Feel free to check them out, or use your own!

To keep things lined up, use a glue stick to attach the paper behind a stick. Repeat that for the bottom of the paper too. Use hot glue all along the back side of the sticks and attach the second set to them. Its kind of like a sandwich where the paper is the meat and the sticks are the bread. Use some string and tie it to each end of the sticks, leaving some slack for hanging.

Add some farmhouse style to your Christmas decorations with this easy DIY Mini Wood Poster Hanger Ornament. Make it in any style to fit your home.

I would love it if you would pin this idea for later. 

Make your own Mini Wood Poster Hanger Ornament

Looking For A Crafty Friend?

Join the facebook group to make crafty friends and share your cricut projects.
Print

Mini Wood Poster Hanger Ornament

Farmhouse style Christmas ornaments – using simple materials you probably already have at home. Make your own mini wood poster hanger ornament.
Prep Time1 minute min
Active Time10 minutes mins
Total Time11 minutes mins
Keyword: Christmas, diy, DIY Christmas ornament, ornament
Yield: 1 Ornament
Author: Brooke

Equipment

  • Glue Gun

Materials

  • Image to print
  • Printer Paper
  • Tongue Depressor
  • Glue stick
  • Twine

Instructions

  • 1. Using an exacto knife or box cutter, trim the rounded edges off 4 tongue depressors. You can stain or paint them to any color you desire, or leave them as is.
  • 2. Print your design and trim it to size.
  • 3. Sandwich your paper between two sticks on the top and two on the bottom.
  • 4. Use a glue gun and hot glue to adhere them all together.
  • 5. Tie string or twine on each end and hang on your tree!
Pin
Share
Post
16Shares

posted in: Christmas, Crafts, Holidays

Previous
Free Printable Planner Stickers
Next
DIY Star Wars Shirts + Free SVG

Reader Interactions

    Leave A Reply! Cancel reply

    Share your thoughts!
    Your email address will not be published. Required fields are marked with *

    RATE THIS!


    This site uses Akismet to reduce spam. Learn how your comment data is processed.

    Comments & Reviews

  1. Tanis says

    November 29, 2020

    This is so cute!!!

    Reply

Primary Sidebar

Brooke - Author of Brooklyn Berry Designs.

Brooke is an interior designer and DIY’er who loves all things creative and crafting. She loves to be busy with at least 3 projects on the go and is constantly chatting or singing along to the radio. As a mom to 4 boys, she is always blending creativity and chaos, with some diet coke mixed in. Stick around for the big projects and get 20 little projects in between.

More About Me

Step By Step Guide To Your Cricut!

Level Up Your Cricut Game - Become a pro in 5 days with this free Cricut email course.

Thank you for subscribing!

Let's Get Creative

Subscribe to get free SVG files, Cricut and laser cutter tutorials, fun printables, and easy crafts right to your inbox! Its free!

Thank you for subscribing!

Featured Projects

  • Customize With Cricut Design Space Tools
  • Best Cricut Access Fonts
  • make your own canada 150 waterbottle
    How to upload your own images with Cricut
  • How To Upload A SVG File To Cricut Design Space

Let's Get Creative

Subscribe to get free SVG files, Cricut and laser cutter tutorials, fun printables, and easy crafts right to your inbox! Its free!

Brooklyn Berry Designs Logo

About

  • Brooklyn Berry Designs
  • About
  • Press/PR
  • Blog
  • Shop

Topics

  • Crafts
  • Cricut Projects
  • SVG Files
  • Printables
  • Cricut Tutorials

Holidays

  • New Years
  • Valentines Day
  • St. Patricks Day
  • Easter
  • Mothers Day
  • Fathers Day
  • Canada Day
  • Back To School
  • Thanksgiving / Fall
  • Halloween
  • Christmas
©2025, Brooklyn Berry Designs. About Press/PR Back To Top
Design by Pixel Me Designs
×

Let's Get Creative

Subscribe to get free SVG files, Cricut and laser cutter tutorials, fun printables, and easy crafts right to your inbox! Its free!

Thank you for subscribing!