• Skip to primary navigation
  • Skip to main content
  • Skip to primary sidebar

Brooklyn Berry Designs

DIY and Design for Creative Moms

  • Family Fun
    • Games & Fun
    • Kids Crafts
    • Lifestyle
    • Book Shelf
  • Crafts
    • Laser Crafts
    • Cricut
      • Cricut Projects
      • Cricut Tutorials
    • Sublimation
  • Holidays
    • New Years
    • Valentines Day
    • St. Patricks Day
    • Easter
    • Mothers Day
    • Fathers Day
    • Summer
    • Patriotic
    • Canada Day
    • Back To School
    • Halloween
    • Thanksgiving / Fall
    • Christmas
  • Digital Downloads
    • SVG Files
    • Printables
  • Shop
  • Brooklyn Berry Designs
  • About
  • Press/PR
  • Blog
  • Shop

Design & Home Decor

Home » Design & Home Decor » My Dining Room Makeover–Before and After

My Dining Room Makeover–Before and After

Created On: June 14, 2012  |  Updated: January 21, 2017  |   16 Comments

Pin
Share
Post
11Shares

This post may contain Amazon and other affiliate links. Using these links, I earn a small commission at no additional cost to you.

My Dining Room Makeover

This is what our dining room looked like when we moved in. The previous owners had moved the dining table right up against the wall to make the room look more spacious (it didn’t trick me!).

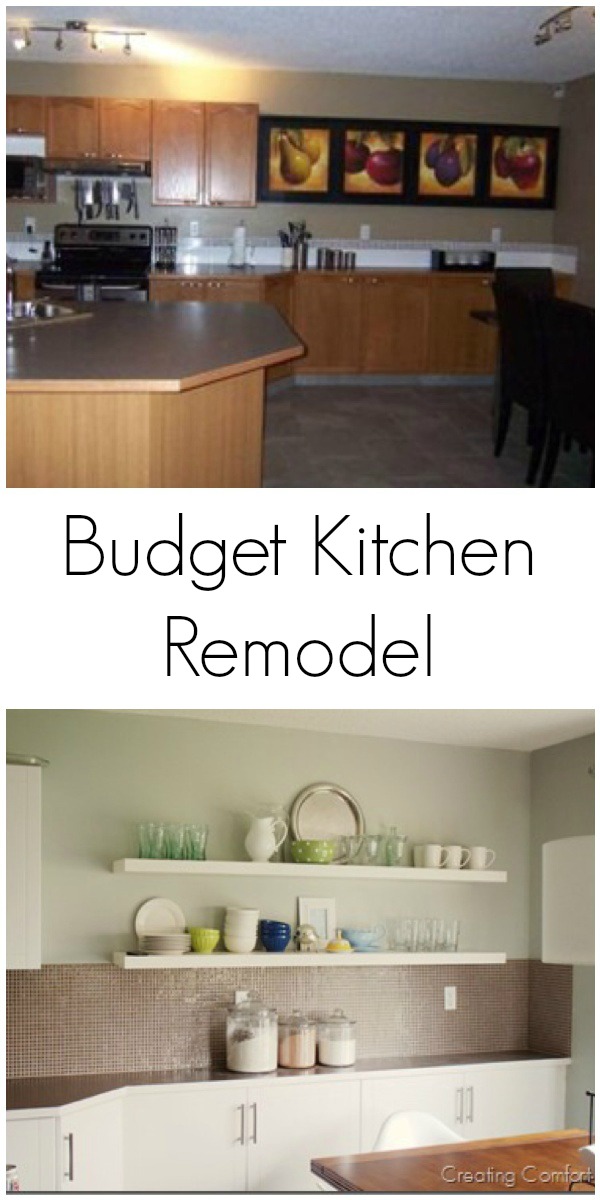
I hated the oak doors but knew I wanted a white kitchen and was fine with painting. The layout was fine for our needs, so I didn’t want to spend the money to replace all of the cabinets. I decided to just replace the doors because the cost was about the same as hiring someone to paint them. Because you don’t see any of the cabinet frames, the only space we painted was the end piece of the right side cabinet.

There is really only one cabinet to store dishes in, so I figured there needs something to balance out the long bank of lower cabinets to the right. It feels really heavy and needed something to add interest on this wall. I searched forever for inspiration on floating shelves.

House Pictures 011-1

House Pictures 014-1

Due to storage issues, these are the cups, bowls and plates we use every day. I am having a hard time finalizing the accessories because it still has to hold our every day dishes.
My husband installed the glass backsplash and hung the shelves for me. We recruited a neighbour and his drill to help install the new hardware.
This room is still very much a work in progress, but its getting there.

TO DO still:

  • Add crown moulding to the cabinets
  • Replace the Pantry Door (the current one needs to be frosted but is missing some panes of glass)
  • Decide on accessories (looks vs. function)

What do you think? What would you change? Do differently? You can see more of the kitchen and my plans for it here.

Budget Kitchen Remodel

Pin
Share
Post
11Shares

posted in: Design & Home Decor

Previous
Infertility and Me
Next
Twins Nursery– My House

Reader Interactions

    Leave A Reply! Cancel reply

    Share your thoughts!
    Your email address will not be published. Required fields are marked with *

    RATE THIS!


    This site uses Akismet to reduce spam. Learn how your comment data is processed.

    Comments & Reviews

  1. SamiJoe says

    June 14, 2012

    I love it!

    Reply
  2. Lisa says

    June 14, 2012

    wow! you are sooooo talented and amazing to do all this and to be a mom to your 3 children!! It looks awesome!!! I absolutely love it!! Great job!! Oh I love what you have put on the shelfs I think it looks great and Those dishes to me look like they are just for decorating cause the dishes we use every day are defiantly not that pretty ours are more like plastic. LOL!!

    Reply
  3. Anonymous says

    June 14, 2012

    i love the look!!!

    Reply
  4. Catherine Dabels says

    June 14, 2012

    I like it. I don’t know what I would do differently because I am freaking exhausted but I do that we must be kindred spirits because sometimes I take a picture and post it or scrapbook it or whatever and I see the random, forgotten can of Diet Coke in the corner.

    Love that.

    Reply
  5. Misty says

    June 14, 2012

    Brooke, I think the floating shelves look fantastic and having the dishes you actually use every day makes so much more sense than occasional use accessories. Also, I love the glass tile! The kitchen looks fresh and modern after the makeover!

    Reply
  6. Kadie Kinney says

    June 14, 2012

    Looks GORGEOUS! I love the backsplash and the shelves. The color is so nice too! Good job girl!

    Reply
  7. Kadie Kinney says

    June 14, 2012

    Looks GORGEOUS! I love the backsplash and the shelves. The color is so nice too! Good job girl!

    Reply
  8. Kadie Kinney says

    June 14, 2012

    Looks GORGEOUS! I love the backsplash and the shelves. The color is so nice too! Good job girl!

    Reply
  9. Domestic Mama says

    June 16, 2012

    Love this – great job ! Found you on the Blissdom newbies group on fb ! Im your newest follower – see you in the fall 🙂

    Reply
  10. Kendall says

    June 16, 2012

    Wow, it looks great!!!

    Reply
  11. L says

    June 26, 2012

    looks incredible B! what did you use for the counters?

    Reply
  12. M says

    June 26, 2012

    I love it! Its looks so much brighter and clean now!

    Reply
  13. Leslie K says

    September 11, 2013

    It already looks so much lighter, brighter and modern! Can’t wait to see the finished product!

    Reply

Primary Sidebar

Brooke - Author of Brooklyn Berry Designs.

Brooke is an interior designer and DIY’er who loves all things creative and crafting. She loves to be busy with at least 3 projects on the go and is constantly chatting or singing along to the radio. As a mom to 4 boys, she is always blending creativity and chaos, with some diet coke mixed in. Stick around for the big projects and get 20 little projects in between.

More About Me

Step By Step Guide To Your Cricut!

Level Up Your Cricut Game - Become a pro in 5 days with this free Cricut email course.

Thank you for subscribing!

Let's Get Creative

Subscribe to get free SVG files, Cricut and laser cutter tutorials, fun printables, and easy crafts right to your inbox! Its free!

Thank you for subscribing!

Featured Projects

  • Customize With Cricut Design Space Tools
  • Best Cricut Access Fonts
  • make your own canada 150 waterbottle
    How to upload your own images with Cricut
  • How To Upload A SVG File To Cricut Design Space

Let's Get Creative

Subscribe to get free SVG files, Cricut and laser cutter tutorials, fun printables, and easy crafts right to your inbox! Its free!

Brooklyn Berry Designs Logo

About

  • Brooklyn Berry Designs
  • About
  • Press/PR
  • Blog
  • Shop

Topics

  • Crafts
  • Cricut Projects
  • SVG Files
  • Printables
  • Cricut Tutorials

Holidays

  • New Years
  • Valentines Day
  • St. Patricks Day
  • Easter
  • Mothers Day
  • Fathers Day
  • Canada Day
  • Back To School
  • Thanksgiving / Fall
  • Halloween
  • Christmas
©2025, Brooklyn Berry Designs. About Press/PR Back To Top
Design by Pixel Me Designs
×

Let's Get Creative

Subscribe to get free SVG files, Cricut and laser cutter tutorials, fun printables, and easy crafts right to your inbox! Its free!

Thank you for subscribing!