• Skip to primary navigation
  • Skip to main content
  • Skip to primary sidebar

Brooklyn Berry Designs

DIY and Design for Creative Moms

  • Family Fun
    • Games & Fun
    • Kids Crafts
    • Lifestyle
    • Book Shelf
  • Crafts
    • Laser Crafts
    • Cricut
      • Cricut Projects
      • Cricut Tutorials
    • Sublimation
  • Holidays
    • New Years
    • Valentines Day
    • St. Patricks Day
    • Easter
    • Mothers Day
    • Fathers Day
    • Summer
    • Patriotic
    • Canada Day
    • Back To School
    • Halloween
    • Thanksgiving / Fall
    • Christmas
  • Digital Downloads
    • SVG Files
    • Printables
  • Shop
  • Brooklyn Berry Designs
  • About
  • Press/PR
  • Blog
  • Shop

Crafts

Home » Crafts » DIY Gumball Machine Ornament

DIY Gumball Machine Ornament

Created On: November 13, 2019  |  Updated: November 13, 2019  |   2 Comments

Pin
Share
Post
84Shares

This post may contain Amazon and other affiliate links. Using these links, I earn a small commission at no additional cost to you.

East kids craft - make this bright and colorful DIY Gumball Machine Ornament. Easy to make, kids will love seeing this on their Christmas Tree. via @brookeberry

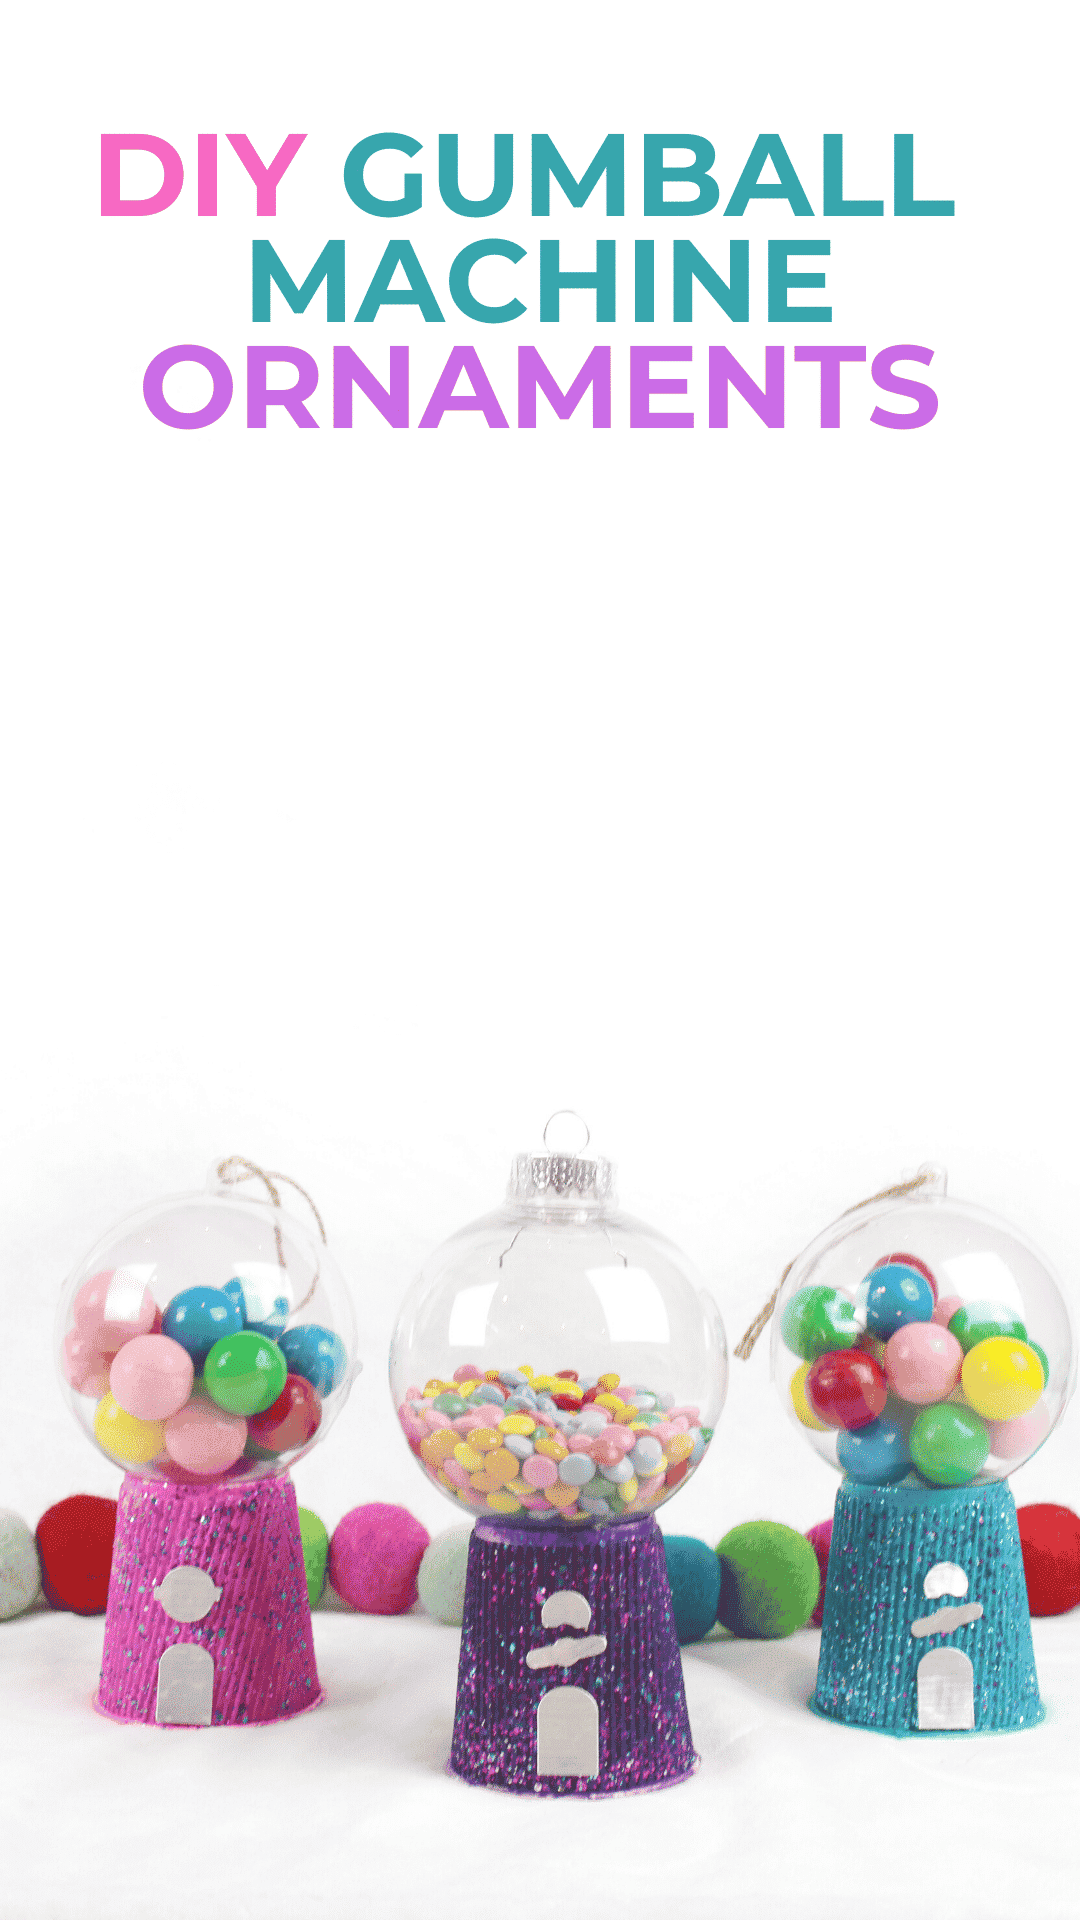
DIY GUMBALL MACHINE ORNAMENT

Who doesn’t love a mini gumball machine? Even better in bright colors as mini ornaments! These are so easy to make, the kids can make their own, and can easily hand on the tree or be grouped together on a table for some fun Christmas decor.

Our house has become obsessed with DIY mini gumball machines. My son learned how to make a functioning machine that dispenses skittles or gumballs stored in a clear ornament and I thought it would be fun to make them in all sorts of fun and bright colors as Christmas Ornaments. For this DIY ornament I decided to skip the dispensing part and just make a cute looking ornament.

Line up these pretty gumballs on a mantle, piano or dinner table for a whimsical and colorful party table. The more the merrier!

Supplies Needed for DIY Gumball Machine Ornament:

  • Gumballs
  • Espresso sized cups
  • Clear plastic fillable Christmas ornament (these are easiest to use)
  • Deco art paint in bright colors and coordinating glitter paint
  • tape
  • hot glue fun
  • Metallic cardstock
  • Design Space file for dial – or cut out your own shapes for the base.

Instructions

  • Paint the cups with craft paint. I used deco art paints in colors Calypso Blue, Milky Way Blue (glitter), Dioxane Purple, Ultraviolet (glitter), Bright Pink, and Clear Ice Commet (glitter). I used two coats of the solid paint to cover the pattern on the cups. Yours might not need as many, depending on the cups you use.
  • Cut an x in the bottom of the ornament so the ornament can sit flat inside.
  • Fill the ornament with candy of choice – I had to use the ornaments that opened completely for the bigger gum balls, but the typical clear ornament with a silver prong in the top would work for smaller candies like M&Ms or skittles.
  • Glue filled ornament to painted cup.
  • Cut the dial design out of cardstock. I used a brushed metal paper and cut it out on my Cricut. (my design file is here)
  • Glue the dial pieces onto the cup.
  • Hang on your tree and enjoy!

Glitter tip: to avoid the ever giving gift of glitter all over the place, I like using products that already have glitter inside them. This glitter paint from Deco Arts has chunky glitter inside, so it covers well and is locked in for no glitter messes!

I am sharing this project as part of Craft Lightnings glitter week! Be sure to check out all the fun projects there.

Pin
Share
Post
84Shares

posted in: Crafts, Kids Crafts

Previous
The Ultimate Cricut Gift Guide
Next
DIY Coloring Pillowcase

Reader Interactions

Primary Sidebar

Brooke - Author of Brooklyn Berry Designs.

Brooke is an interior designer and DIY’er who loves all things creative and crafting. She loves to be busy with at least 3 projects on the go and is constantly chatting or singing along to the radio. As a mom to 4 boys, she is always blending creativity and chaos, with some diet coke mixed in. Stick around for the big projects and get 20 little projects in between.

More About Me

Step By Step Guide To Your Cricut!

Level Up Your Cricut Game - Become a pro in 5 days with this free Cricut email course.

Thank you for subscribing!

Let's Get Creative

Subscribe to get free SVG files, Cricut and laser cutter tutorials, fun printables, and easy crafts right to your inbox! Its free!

Thank you for subscribing!

Featured Projects

  • Customize With Cricut Design Space Tools
  • Best Cricut Access Fonts
  • make your own canada 150 waterbottle
    How to upload your own images with Cricut
  • How To Upload A SVG File To Cricut Design Space

Let's Get Creative

Subscribe to get free SVG files, Cricut and laser cutter tutorials, fun printables, and easy crafts right to your inbox! Its free!

Brooklyn Berry Designs Logo

About

  • Brooklyn Berry Designs
  • About
  • Press/PR
  • Blog
  • Shop

Topics

  • Crafts
  • Cricut Projects
  • SVG Files
  • Printables
  • Cricut Tutorials

Holidays

  • New Years
  • Valentines Day
  • St. Patricks Day
  • Easter
  • Mothers Day
  • Fathers Day
  • Canada Day
  • Back To School
  • Thanksgiving / Fall
  • Halloween
  • Christmas
©2025, Brooklyn Berry Designs. About Press/PR Back To Top
Design by Pixel Me Designs
×

Let's Get Creative

Subscribe to get free SVG files, Cricut and laser cutter tutorials, fun printables, and easy crafts right to your inbox! Its free!

Thank you for subscribing!