• Skip to primary navigation
  • Skip to main content
  • Skip to primary sidebar

Brooklyn Berry Designs

DIY and Design for Creative Moms

  • Family Fun
    • Games & Fun
    • Kids Crafts
    • Lifestyle
    • Book Shelf
  • Crafts
    • Laser Crafts
    • Cricut
      • Cricut Projects
      • Cricut Tutorials
    • Sublimation
  • Holidays
    • New Years
    • Valentines Day
    • St. Patricks Day
    • Easter
    • Mothers Day
    • Fathers Day
    • Summer
    • Patriotic
    • Canada Day
    • Back To School
    • Halloween
    • Thanksgiving / Fall
    • Christmas
  • Digital Downloads
    • SVG Files
    • Printables
  • Shop
  • Brooklyn Berry Designs
  • About
  • Press/PR
  • Blog
  • Shop

Crafts

Home » Cricut » Cricut Projects » Iron On Vinyl » DIY Coloring Pillowcase

DIY Coloring Pillowcase

Created On: November 20, 2019  |  Updated: April 26, 2024  |   5 Comments

Pin
Share
Post
242Shares

This post may contain Amazon and other affiliate links. Using these links, I earn a small commission at no additional cost to you.

DIY Coloring Pillowcase via @brookeberry

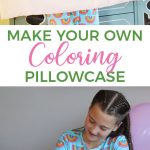
Celebrate a Pajama Party with a DIY coloring pillowcase station! Each kid can make their own pillow with iron on vinyl and fabric markers to decorate as they wish!

Girls Birthday Party Ideas

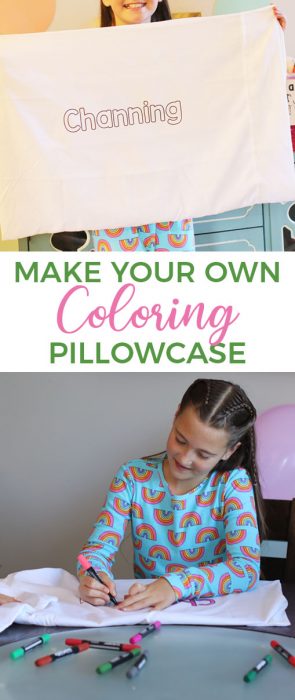
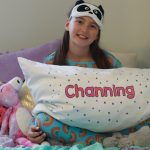
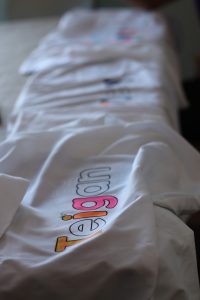
Are you looking for an activity to keep school aged kids entertained on a rainy day or for a birthday party? We recently had a pajama birthday party for some 9 year old girls. They all came dressed in their pajamas and their favorite activity of the afternoon (besides birthday cake, of course) was decorating pillow cases. Each girl got a pillowcase with their name written in outlined letters with iron on vinyl. They were then given fabric markers and allowed to color and design until their hearts were content.

To make a DIY Coloring Pillowcase, you will need:

  • Digital Cutting Machine (Silhouette or Cricut work great)
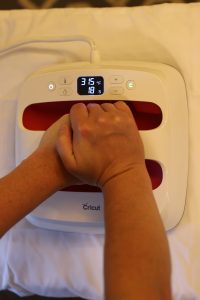
  • Cricut EasyPress 2
  • Cricut EasyPress Mat
  • Iron on Vinyl
  • Fabric Markers – either washable or permanent

Instructions for use and washing:

Before placing the pillowcase into the washer, spray with a stain remover to help remove the marker easier. Do NOT add bleach or fabric softener. Wash separately. Air dry or tumble dry on low heat.

You could easily adapt this project to make coloring canvas tote bags or t-shirts!

DIY Gift Idea – Coloring Shirts

Wouldn’t a DIY coloring shirt make a fun gift? You could make a shirt and bundle it with some markers! If you want options besides their name, My Designs In The Chaos has some awesome Free Girl Coloring Book SVG Files that would be perfect for this.

Happy Crafting!

Print Pin This
5 from 1 vote

DIY Coloring Pillowcase

A great activity for kids! Make your own coloring pillowcase – use washable markers to color it over and over again!
Prep Time15 minutes mins
Active Time15 minutes mins
Total Time30 minutes mins
Course: Crafts
Keyword: DIY Coloring Pillowcase
Yield: 1 Pillowcase
Author: Brooke Berry

Equipment

  • Cricut Explore Air 2
  • EasyPress
  • EasyPress Mat
  • Wedding Tool

Materials

  • Iron on Vinyl – Black
  • Blank Pillowcase
  • Fabric Markers

Instructions

  • Type your name in Cricut Design Space. A great outline font available with Cricut Access is Cricut Sans Outline, or you can use any other font you have downloaded to your computer.
  • Cut out design with the Cricut Explore Air 2. Remember to mirror image your text! Weed the vinyl and it is ready to iron on! It should have a clear sheet of plastic on top of the design.
  • Warm up the EasyPress and place the pillowcase over the heating mat. After warming the pillowcase with the easypress, place the iron on vinyl design onto the pillowcase. Heat according to the Heat Settings Guide for your material and peel as directed.
  • Before coloring place a piece of cardboard inside of the pillowcase so the markers do not bleed from the front to the back.

Notes

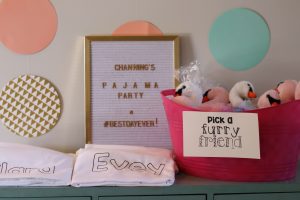
To make it easier, you may want to cut out and iron on your names prior to the guests arriving. The coloring is the fun part!

Looking For A Crafty Friend?

Join the facebook group to make crafty friends and share your cricut projects.
Pin
Share
Post
242Shares

posted in: Crafts, Cricut Projects, Iron On Vinyl

Previous
DIY Gumball Machine Ornament
Next
Bright, Colorful, Printable Christmas Gift Tags

Reader Interactions

    Leave A Reply! Cancel reply

    Share your thoughts!
    Your email address will not be published. Required fields are marked with *

    RATE THIS!


    This site uses Akismet to reduce spam. Learn how your comment data is processed.

    Comments & Reviews

  1. Barbara@sewingmachinesview says

    February 17, 2020

    Thank you so very much for this well designed instruction. My mom taught me some sewing basics when I was about 10. Yes that was a long time ago! Now it is my turn to help teach my 10 year old granddaughter and I plan to use your instructions. I know we can do it thanks to you.

    Reply
  2. SandraII Sewing machine addict says

    May 2, 2020

    Hey, Really good instructions for sewing. I will use the tips of sewing for my students.
    Thanks for sharing!

    Reply
  3. Rebecca Donovan says

    July 18, 2023

    5 stars
    This is genius, definitely going to do this for my daughter’s sleepover! Amazing job.

    Reply

Primary Sidebar

Brooke - Author of Brooklyn Berry Designs.

Brooke is an interior designer and DIY’er who loves all things creative and crafting. She loves to be busy with at least 3 projects on the go and is constantly chatting or singing along to the radio. As a mom to 4 boys, she is always blending creativity and chaos, with some diet coke mixed in. Stick around for the big projects and get 20 little projects in between.

More About Me

Step By Step Guide To Your Cricut!

Level Up Your Cricut Game - Become a pro in 5 days with this free Cricut email course.

Thank you for subscribing!

Let's Get Creative

Subscribe to get free SVG files, Cricut and laser cutter tutorials, fun printables, and easy crafts right to your inbox! Its free!

Thank you for subscribing!

Featured Projects

  • Customize With Cricut Design Space Tools
  • Best Cricut Access Fonts
  • make your own canada 150 waterbottle
    How to upload your own images with Cricut
  • How To Upload A SVG File To Cricut Design Space

Let's Get Creative

Subscribe to get free SVG files, Cricut and laser cutter tutorials, fun printables, and easy crafts right to your inbox! Its free!

Brooklyn Berry Designs Logo

About

  • Brooklyn Berry Designs
  • About
  • Press/PR
  • Blog
  • Shop

Topics

  • Crafts
  • Cricut Projects
  • SVG Files
  • Printables
  • Cricut Tutorials

Holidays

  • New Years
  • Valentines Day
  • St. Patricks Day
  • Easter
  • Mothers Day
  • Fathers Day
  • Canada Day
  • Back To School
  • Thanksgiving / Fall
  • Halloween
  • Christmas
©2025, Brooklyn Berry Designs. About Press/PR Back To Top
Design by Pixel Me Designs
×

Let's Get Creative

Subscribe to get free SVG files, Cricut and laser cutter tutorials, fun printables, and easy crafts right to your inbox! Its free!

Thank you for subscribing!