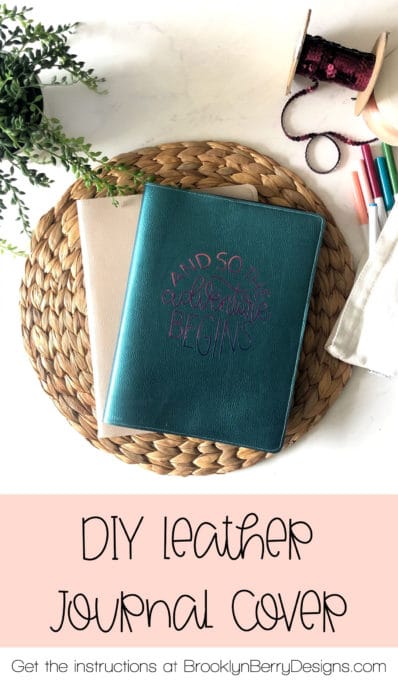
Ready to make your own DIY leather journal cover that looks luxe but is inexpensive to craft? Whether you’re using a Cricut cutting machine or cutting by hand, this step-by-step tutorial shows you how to create a custom leather composition book cover that’s durable and reusable.
Back To School – DIY Composition Notebooks
There is nothing more satisfying than gathering new school supplies for a new year of school. For those of us not currently in school, a new notebook is a perfect place to doodle, take notes, or make to-do lists. Personally, I find I need to write things down to help prioritize my daily tasks. So take advantage of those back-to-school sales and make something for yourself!
Alternate Ways To Use Cute Notebooks
Journals and notebooks can be made into so many different styles and uses. My most commonly used notebooks are a to-do list notebook, bullet journal, spiritual journal (more doodles and phrases that stand out to me), and travel journals. A great journal idea I see often is a travel notebook where you can attach ticket stubs, pictures, and notes as a keepsake.
What makes journals and notebooks even more special is when they feel nice. The feel of the paper, the right pen and ink style, or a leather journal cover – what qualities do you treasure in a notebook? For me, it is a pretty journal cover and a pen that makes me like my writing.
Customized composition book covers are a great gift for a friend or family member.
Easy DIY notebook cover
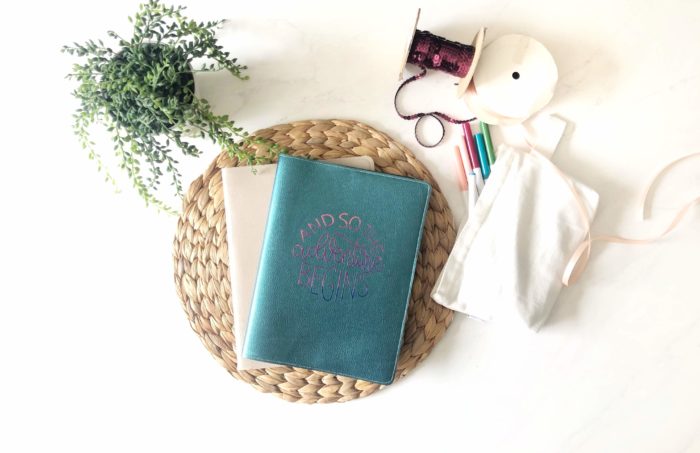
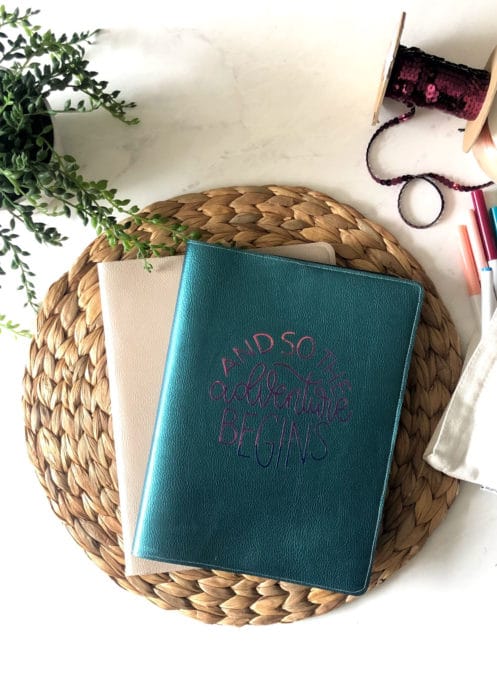
If you love a luxurious journal cover you will love the project I am sharing today – a reusable DIY leather journal cover. Starting with an inexpensive composition book, I’ll show you how to make a leather journal cover with your Cricut.
Don’t have a cricut machine? I will also provide a template to cut materials by hand or a different way to create a gorgeous DIY notebook cover with other materials.

Tips For Cutting Leather With Your Cricut
- You can use genuine leather or faux leather for this DIY journal cover. Faux leather is thinner, which makes it easier to cut with the Cricut.
- Place leather pretty side down on the cutting mat and mirror image your design before cutting. This helps your cutting mat to last the longest.
- Another option to keep your cutting mats nice is to put transfer tape on the fuzzy side of the leather before adhering it to the cutting mat.
- Make sure the leather is attached really well to the mat. Use a brayer to push down on the leather. You can use painter’s tape or masking tape to secure the leather to your mat.
- With genuine leather, move the white star rollers on the roller bar to the side – they will indent the leather if not moved.
What You’ll Make
A Leather journal cover for students, or bullet journal lovers
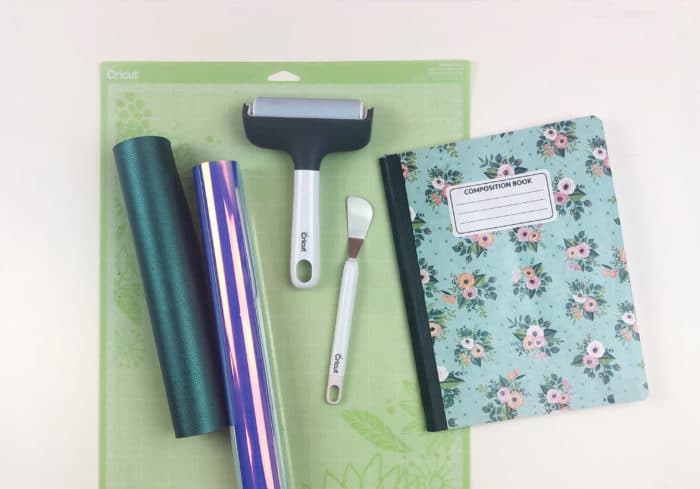
Tools & Materials You’ll Need
Here is what you will need to make this DIY leather journal cover:
- Cricut Maker or Explore (also found on Amazon)
- Cutting mat, standard grip
- Deep cut blade and standard grip mat
- Cricut faux leather
- Holographic iron-on vinyl
- Cricut easy press
- Easy press mat
- SVG Cut File (free with email signup)
- Sewing Machine or hand-stitch tools
Step-by-Step Tutorial
Step 1 – Upload & Prepare Your SVG File
Upload the SVG file to design space (available for free to my email subscribers – enter your email at the end of this post to have it sent to your inbox).
Step 2 – Cut Leather with Cricut
Cut out the leather pieces with your Cricut Explore or Cricut Maker.
Step 3 – Cut and Apply HTV Design
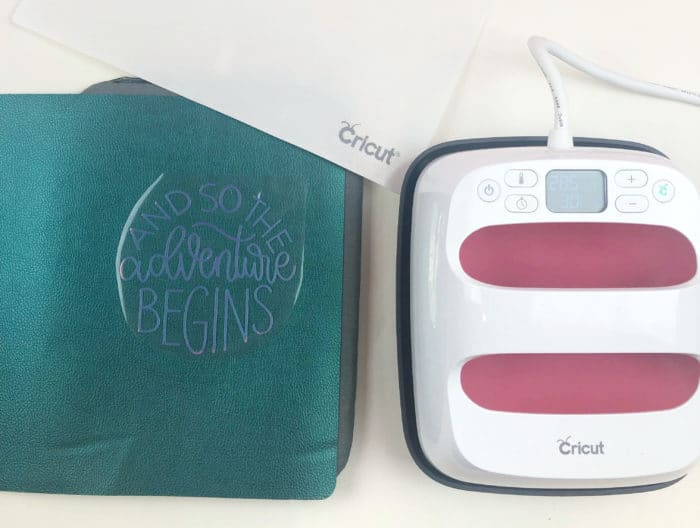
Cut out the design for the front of the notebook – I used the design from Cricut Design Space (Design space file – #MAEFFD90) but any design or text would work.
Adding an HTV design is a great way to customize the front of your notebook, and you could also choose to add something to the back cover! Remember to cut the design mirrored, and adhere it using an easy press.
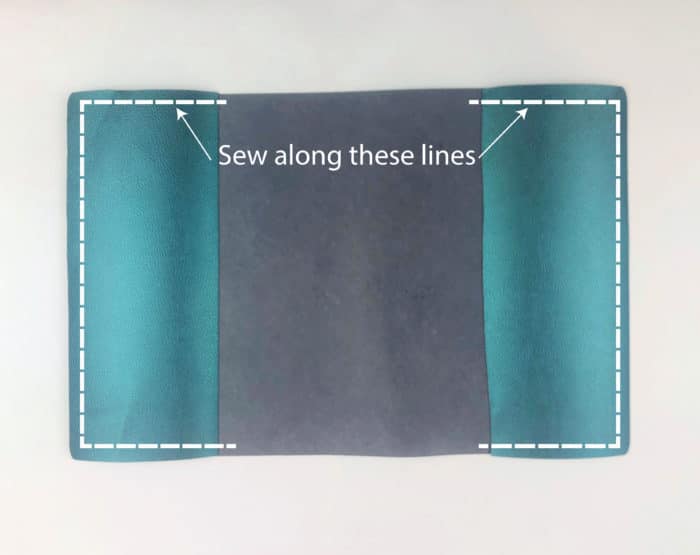
Step 4 – Sew the Leather Cover
Because leather doesn’t fray I chose to sew the notebook together with the raw edges exposed. If you were sewing with fabric you would place the right sides together, but in this case, we aren’t going to do that.
Clip your leather pieces in place, working around the rounded corners. Binder clips are a great idea to hold the pieces together without making holes in the leather.
Test fit your notebook into the sleeves making sure the right and left side each fit into the cover with enough room to close the notebook.
Using a sewing machine, sew your notebook together, allowing for a very small seam allowance, about 1/8 inch. Sew a straight line along each of the edges. I chose to start at the center of the bottom edge of the notebook, being extra careful along each side of the notebook where there are two layers of leather.
Step 5 – Insert Notebook Into Cover
Once finished, slide each side into the cover. Use and enjoy as you like!
More DIY Composition Notebook Covers:
Creative ways to decorate a plain notebook
- Use contact paper or gift wrap to create a cover. This tutorial uses this method, using a pretty floral gift wrapping paper with mod podge. Seal the cover panel pieces by using a coordinating piece of duct tape for the spine. If the paper you are using is a light color you may want to add a base layer of a white sheet of paper to prevent the bright colors or patterns on the front cover from showing through.
- You could make an entire cover with duck tape or washi tape- not only is it very durable it comes in pretty patterns and designs.
- Create a fabric cover with a piece of fabric. You can use pretty fabric pieces, even some fat quarters! There is a detailed tutorial on Dainty Dress Diaries. For a more advanced option, this tutorial includes pockets for additional storage.
- Paint your own designs with acrylic paint.
Cricut Leather Projects
If you love this DIY leather journal cover, you will love these other leather projects using the Cricut!
Download The Journal Cover Template
Enter your email below to get the free SVG cut file and start creating today!
This file is Printable File C64 in our Freebie Library! Get the password to the Freebie Library by signing up for our email in the form below! If you already have the password, jump on over to the Freebie Library to download the file now!
All free downloads from Brooklyn Berry Designs are for PERSONAL and CLASSROOM USE ONLY. You MAY NOT share, distribute, sell, or use these files for commercial purposes, including print-on-demand. Commercial licenses for SVG and PNG crafting files may be purchased separately.
Happy Crafting!
Yes — I include a hand-cut option too!
It’s sized for standard composition books, but you can adjust the template to accomodate any other sized notebook.
Faux leather is thinner and easier to cut on a Cricut compared to genuine leather.

Comments & Reviews
Jessica says
Oooh, I love this!! Great job!
Crystal says
Brooke this is gorgeous! I love the color and the design is just the cutest! I think I need to make myself one of these!
Erin says
Oh my goodness! Soooo pretty!!
Cori says
These turned out so pretty!!
Liz says
This turned out so cute!
Melissa says
Can you please send the link to the Cricut design file (leather journal)? When I click on it, it opens a blank canvas. Thank you!
Brooke says
Search on cricut design space for #MAEFFD90 or just “So The Adventure Begins” and you will find it!
Kellie Green says
Hi! Neither of these options work.
Brooke says
Which options are you referring to?
Kellie Green says
Searching for the name nor the code work in design space.
Bel Wilds says
Hi Brooke
I can’t seem to find the file on design space either…i’ve tried both options in the search bar.
Do you have any suggestions as too where I can find it?
Thanks
Sarah says
What size composition notebook did you use?
Brooke says
It is just the standard size book from the dollar store? All of them I bought a various stores were all the same size. You can always adjust it to fit a different style of notebook.
Gemma says
Hi, I also can’t find this on design space. Can you help?
Brooke says
Try typing in adventure begins. The design is #MAEFFD90
Cheryl says
Hi, the notebook is beautiful. I’d like to try making it, but I cannot access any cut file for the leather pieces. Searching by text or file number only results in the “Adventure awaits” graphic, which isn’t really what I want. I’m mostly looking for the cut file for the notebook pieces. Can you send or repost them? If not, I’ll need to devise my own:)
Thanks!
Brooke says
I guess Cricut changed how they can share links to design files. I made the journal cover with basic shapes, but let me see if I can save it as a different file type and I can email it to you.
Gemma says
Could I please get a copy also? Thanks
Nikki says
Hi! I would love to make this too! May I also have the file emailed please?
Thank you 🙂
alice R says
Hi, there I can’t seem to find it either. Can you send me a link?
Brooke says
I sent it to you!
Cody S says
How do you move the “stars” on the main machine rod?
We have an explore air 2, and those puppies are glued in place, one star cog every 3 inches, so there’s no place I can put leather that it won’t get marred by their teeth.
And they’re low too, so even 2mm thin leather will still get indents.
Which is incredibly frustrating.
Brooke says
It seems like they are stuck in place, but you can push them. It will make a squeaky noise, but they will be fine. You have to insist a bit.
Brookr says
This looks like a great project. I see tips on how to do it, but no actual directions. Can you point me in the right direction?
Brooke says
AH! I see something happened and all the instructions disappeared. I just fixed it, hope that helps!