• Skip to primary navigation
  • Skip to main content
  • Skip to primary sidebar

Brooklyn Berry Designs

DIY and Design for Creative Moms

  • Family Fun
    • Games & Fun
    • Kids Crafts
    • Lifestyle
    • Book Shelf
  • Crafts
    • Laser Crafts
    • Cricut
      • Cricut Projects
      • Cricut Tutorials
    • Sublimation
  • Holidays
    • New Years
    • Valentines Day
    • St. Patricks Day
    • Easter
    • Mothers Day
    • Fathers Day
    • Summer
    • Patriotic
    • Canada Day
    • Back To School
    • Halloween
    • Thanksgiving / Fall
    • Christmas
  • Digital Downloads
    • SVG Files
    • Printables
  • Shop
  • Brooklyn Berry Designs
  • About
  • Press/PR
  • Blog
  • Shop

Home Decor

Home » BEGINNERS FURNITURE PAINTING

BEGINNERS FURNITURE PAINTING

Created On: August 27, 2017  |  Updated: August 28, 2017  |   Leave a comment

Pin
Share
Post
46Shares

This post may contain Amazon and other affiliate links. Using these links, I earn a small commission at no additional cost to you.

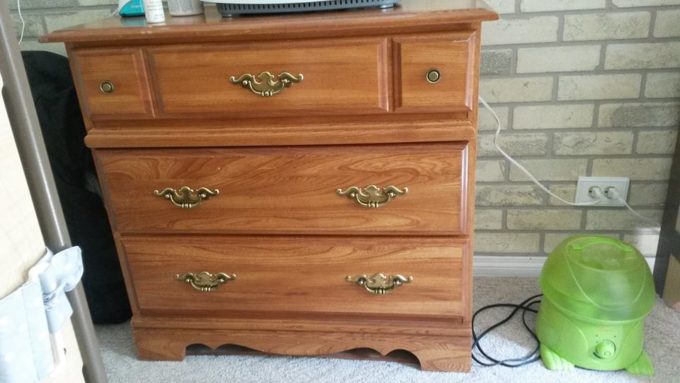
I’ve had this dresser for the better part of 20 years and when my daughter was born, it became hers. As I’ve been decorating her nursery, I had fallen out of love with this particular piece of furniture. It had become dated and didn’t match the colour scheme of her room at all. In short, it stuck out like a sore thumb and, since changing its address to the hallway isn’t an option, something had to be done.

This is my first ever foray into the world of furniture refinishing. I was always intimidated by all the prep work – the sanding, the priming – but now you can get products that allow you to skip some of those steps (somewhat). I would still recommend doing a bit of the prep work (at least a light sanding to rough up the original finish) because the paint will go on better.

THE PAINT

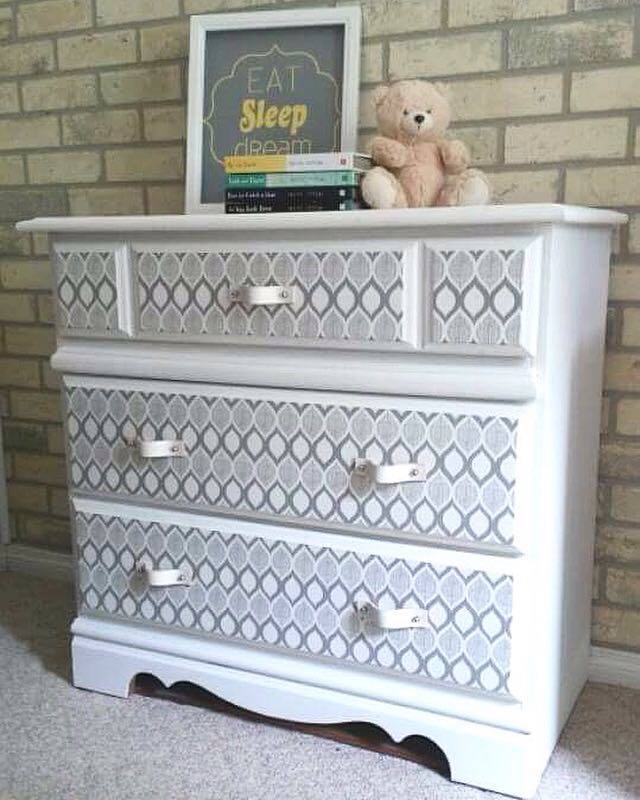
I picked up some  Rust-oleum Chalked (ultra matte finish) in Linen White at Walmart and, while I was there, grabbed some patterned contact paper over in the housewares section. I don’t think I need to go into details about how this dresser came together because the after picture speaks for itself.   You don’t need me to tell you to paint then measure and apply contact paper – that’s really all there was to it. I will say this about the contact paper I chose however, it is designed to be easily removable so if you’re not a fickle decorator, you will want to put a bit of glue around the edges so that it doesn’t peel up on you down the road.

DIY LEATHER HANDLES

For updated drawer pulls, I made straps from some leather my husband had in his stash of manly hobby supplies. I painted them with the same paint used on the dresser so they match, waxed them so they don’t crack and attached them with acorn nuts. You could distress your finished project if that’s your jam, but for me personally that look is overdone.

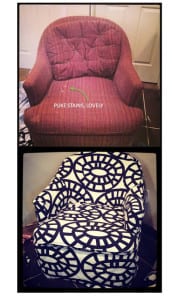
I’ve gotta say, this dresser has never looked better. Who knew that a little paint and contact paper could make such a boring dresser look so fabulous? I guess refinishing furniture isn’t so scary afterall.

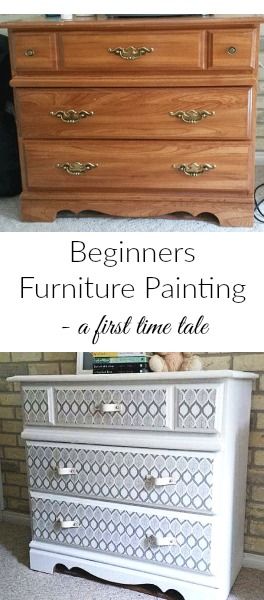
Can you believe what a great transformation this is? Pin it for later:

BEGINNERS FURNITURE PAINTING

If you dream of refinishing furniture around your home, you should check out these posts:


Vintage high chair

Tray Table Makeover

Slipcovering tips and tricks

Pin
Share
Post
46Shares

posted in: Home Decor

Previous
Ultimate Cricut Explore Guide – answering all your questions
Next
Free Printable Room Planner

Reader Interactions

Leave A Reply! Cancel reply

Share your thoughts!
Your email address will not be published. Required fields are marked with *

RATE THIS!


This site uses Akismet to reduce spam. Learn how your comment data is processed.

Primary Sidebar

Brooke - Author of Brooklyn Berry Designs.

Brooke is an interior designer and DIY’er who loves all things creative and crafting. She loves to be busy with at least 3 projects on the go and is constantly chatting or singing along to the radio. As a mom to 4 boys, she is always blending creativity and chaos, with some diet coke mixed in. Stick around for the big projects and get 20 little projects in between.

More About Me

Step By Step Guide To Your Cricut!

Level Up Your Cricut Game - Become a pro in 5 days with this free Cricut email course.

Thank you for subscribing!

Let's Get Creative

Subscribe to get free SVG files, Cricut and laser cutter tutorials, fun printables, and easy crafts right to your inbox! Its free!

Thank you for subscribing!

Featured Projects

  • Customize With Cricut Design Space Tools
  • Best Cricut Access Fonts
  • make your own canada 150 waterbottle
    How to upload your own images with Cricut
  • How To Upload A SVG File To Cricut Design Space

Let's Get Creative

Subscribe to get free SVG files, Cricut and laser cutter tutorials, fun printables, and easy crafts right to your inbox! Its free!

Brooklyn Berry Designs Logo

About

  • Brooklyn Berry Designs
  • About
  • Press/PR
  • Blog
  • Shop

Topics

  • Crafts
  • Cricut Projects
  • SVG Files
  • Printables
  • Cricut Tutorials

Holidays

  • New Years
  • Valentines Day
  • St. Patricks Day
  • Easter
  • Mothers Day
  • Fathers Day
  • Canada Day
  • Back To School
  • Thanksgiving / Fall
  • Halloween
  • Christmas
©2025, Brooklyn Berry Designs. About Press/PR Back To Top
Design by Pixel Me Designs
×

Let's Get Creative

Subscribe to get free SVG files, Cricut and laser cutter tutorials, fun printables, and easy crafts right to your inbox! Its free!

Thank you for subscribing!